
Handmade Christmas cards can turn anyone into a crafty genius, bringing holiday cheer with paper, paint, and even a sprinkle of glitter. From washi tape trees and embroidered designs to silly Grinch handprints or pop-up paper trees, these projects are perfect for sharing laughs, getting messy, and making something truly memorable. Whether it’s a snow globe card, a footprint snowman, or a paper wreath masterpiece, there are so many fun ideas just waiting to be explored next.
Quick Takeaways:
- Use washi tape, embroidery, or cookie cutters to create visually striking and unique handmade Christmas card designs
- Incorporate interactive elements like snow globes or pop-up 3D trees for added surprise and fun
- Get the whole family involved with footprint snowmen, handprint Grinch faces, or collaborative decorating for memorable keepsakes
- Personalize cards with family photos, handwritten messages, or creative embellishments for a heartfelt touch
1. Washi Tape Christmas Tree Cards
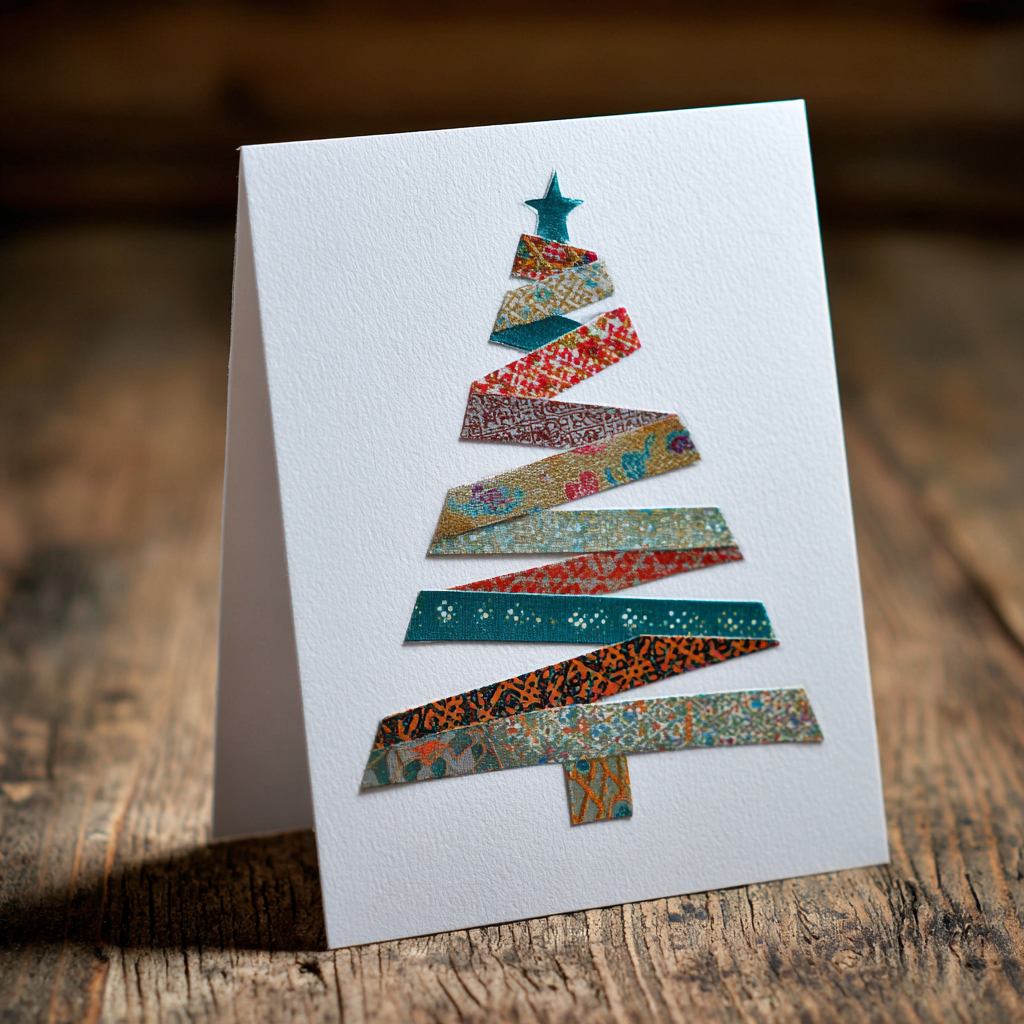
Washi tape Christmas tree cards are basically the lazy genius’s dream craft—no painting skills required, just straight lines and a steady hand (or not, wobbly trees have character too!). The beauty of this handmade Christmas card idea is that anyone can grab some colorful washi tape and start sticking strips down in a triangle shape on cardstock. No two trees look the same, which makes each card feel extra special and not like it came from some cookie-cutter factory.
The trick is layering different patterns and colors of washi tape to give the tree depth and personality. Some folks like to go all matchy-matchy with greens and golds, while others throw caution to the wind with rainbow stripes or polka dots. Either way works! After the tree is done, adding a tiny star sticker or button on top plus a simple “Merry Christmas” message really seals the deal.
What’s cool about washi tape is that it peels off easily if you mess up, so there’s zero pressure to be perfect. Kids love this one because they can choose their favorite tape patterns and go wild with creativity. Plus, these cards come together in about 10 minutes, making them perfect for last-minute holiday greetings or when you suddenly remember you forgot Aunt Linda.
Here’s what makes washi tape tree cards awesome:
- Super forgiving—peel and reposition if needed
- Endless color and pattern combinations
- Quick to make, even in bulk
- Perfect for kids and adults alike
2. Embroidered Christmas Tree Cards

Nothing screams “I put actual effort into this” quite like an embroidered Christmas tree card. This handmade Christmas card takes things up a notch with thread and needle, turning simple cardstock into something that looks like it belongs in a fancy craft boutique. The process is surprisingly chill—just poke some holes in a tree pattern, thread some embroidery floss through, and watch the magic happen.
It helps to start with a simple Christmas tree pattern. That way, even if someone’s new to stitching, the end result still looks awesome and not like a tangled mess of spaghetti. Sturdy cardstock is a must; flimsy cards just won’t cut it when you start poking holes. Trying out different stitches, like backstitch or satin stitch, adds cool texture and makes each card unique. It’s both crafty and seriously cheerful!
Picking out the perfect floss and pattern is just the beginning—now comes the part that really brings these embroidered tree holiday cards to life: adding personal touches. Sure, anyone can stitch a tree, but what about making it look like it’s wearing a funky sweater or adding a mini star button on top? That’s how a handmade card goes from “nice” to “wow, did you really make this?”
Personal touches that make embroidered cards pop:
- Choose thread colors that match your recipient’s style or favorite team
- Add cute little beads as ornaments on the branches
- Stitch a tiny initial or message at the base of the tree
- Mix metallic and regular threads for extra sparkle
3. 3D Paper Christmas Tree Pop-Up Cards
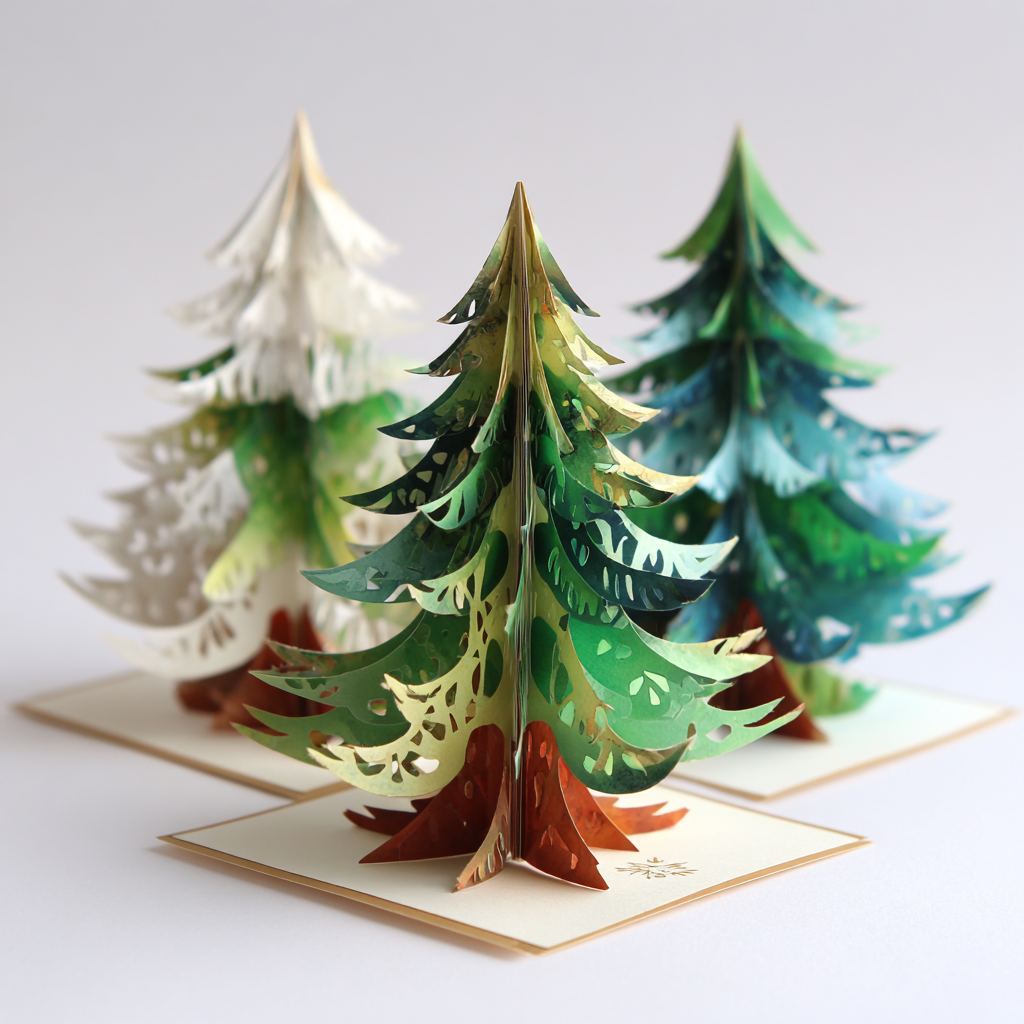
After getting creative with washi tape and embroidery, it’s time to step up the holiday card game with something that really pops—literally! The 3D Paper Christmas Tree Card is a handmade Christmas card that brings a burst of excitement to anyone who opens it. This card can be made in about 15 minutes, making it a perfect quick craft for busy days or last-minute gifts.
Kids and adults can let their imaginations run wild by choosing tree colors beyond classic green—think pink, blue, or even rainbow stripes! Making this card is not just easy; it’s a fun family activity that sparks laughter and teamwork. Plus, the pop-up tree inside is such a cool surprise!
The secret to a good pop-up tree is all in the folds. Starting with accordion-folded paper strips that get progressively smaller creates that classic Christmas tree shape. Gluing them onto a center fold in the card makes the tree spring up when opened—total wow factor guaranteed. Some people like to add tiny pom-poms or sequins as ornaments, which takes it from cute to spectacular.
Steps to make your 3D pop-up tree:
- Cut strips of colored paper in graduated sizes (longest at bottom, shortest at top)
- Fold each strip accordion-style for texture
- Glue strips vertically along the card’s center fold, largest to smallest
- Decorate with mini embellishments like stickers, glitter, or drawn ornaments
- Add a star on top and a festive message inside
4. Watercolor Christmas Wreath Cards
Watercolor Christmas wreath cards bring that soft, dreamy holiday vibe that makes people go “aww” the second they see them. This handmade Christmas card idea is all about letting colors blend and flow together, creating wreaths that look like they’re straight out of a winter wonderland. Even if someone’s never touched a paintbrush before, watercolors are super forgiving—just add water, swirl some green, and boom, instant festive magic.
The best part about painting wreaths is that there’s no “right” way to do it. Some folks like to paint individual leaves and berries in a perfect circle, while others prefer loose, abstract shapes that still totally read as “wreath.” Adding touches of red for holly berries or gold for a little sparkle gives the design extra personality. And if the paint bleeds outside the lines? That just makes it look more artistic and handmade.
For anyone worried about their painting skills, using a simple pencil outline of a circle as a guide helps keep things on track. After the wreath dries, adding a bow at the bottom with a gold gel pen or even a real ribbon really ties the whole thing together. These cards look way more impressive than the effort they actually take!
Tips for perfect watercolor wreaths:
- Start with a light pencil circle as your guide
- Layer greens in different shades for depth
- Add berries and pinecones while the paint is still wet for a blended effect
- Use a fine-tipped brush or pen for details like tiny branches
- Let it dry completely before adding bows or sentiments
5. Snow Globe Shaker Cards
Snow Globe Shaker Cards are like carrying a tiny winter wonderland in an envelope—and who wouldn’t want that? This interactive handmade Christmas card literally shakes and moves, making it way more fun than your average flat greeting. The concept is simple: create a little window on the card front, fill it with sequins or glitter, and seal it up so everything bounces around like a real snow globe.
Making one of these cards feels a bit like a fun science experiment meets art project. First, cut a window in the front of the card (circles work great for that classic snow globe look), then use foam tape to create a raised border around the opening. Drop in some snowflake sequins, tiny stars, or even micro beads before sealing it with a clear sheet of acetate or plastic. When someone picks up the card and gives it a shake, all the glittery bits swirl around like fresh snowfall—pure magic!
The trick is not overfilling the shaker part. Too many sequins and nothing moves; too few and it looks sad and empty. Finding that sweet spot makes all the difference. Adding a hand-drawn or stamped winter scene inside the globe, like a snowman or a little Christmas tree, gives the shaker something to showcase. These cards take a bit more time than others, but the recipient’s reaction is always worth it.
What you need for snow globe shaker cards:
- Cardstock base with a cut-out window (circle, square, or custom shape)
- Foam tape or mounting squares to create depth
- Clear acetate sheet to seal the front
- Sequins, glitter, or confetti for the “snow”
- A cute scene or sentiment behind the shaker element
6. Handprint and Footprint Holiday Cards
Handprint and footprint holiday cards are an absolute hit for families with little ones—because nothing says “cuteness overload” quite like a tiny hand or foot turned into festive art. These handmade Christmas cards capture a moment in time, and let’s be honest, parents and grandparents lose their minds over them. A footprint can become a snowman, complete with a carrot nose and stick arms, while handprints transform into reindeer antlers or even a cheeky Grinch face.
The process is delightfully messy, which is half the fun. Kids dip their hands or feet in washable paint, stamp them onto cardstock, and then everyone gets to decorate together. A footprint snowman might need a tiny hat and scarf drawn on with markers, while handprint reindeer antlers look even better with googly eyes glued to the palm print. These cards aren’t just greetings—they’re keepsakes that families treasure for years.
What makes these cards extra special is how personal they are. Each handprint or footprint is unique, so no two cards are alike. Adding the child’s name and age on the back makes them even more memorable. Teachers love assigning these as classroom projects too, and parents end up with adorable art that doubles as holiday cards for the whole family.
Ideas for handprint and footprint designs:
- Footprint snowman with a top hat and coal buttons
- Handprint reindeer with antlers made from little fingers
- Grinch face using a green handprint and adding facial features
- Christmas tree made from multiple handprints in green paint
- Santa’s beard created with white handprints arranged in layers
7. Paper Wreath Die-Cut Cards
Paper Wreath Die-Cut Cards bring precision and polish to handmade Christmas cards without requiring any painting or drawing skills—just a die-cut machine and some pretty paper. These cards are perfect for crafters who love clean lines and professional-looking results. The die does the hard work, cutting out intricate wreath shapes from cardstock or patterned paper, leaving behind designs that look like they took hours but really didn’t.
The cool thing about die-cut wreaths is the endless customization. Layer different shades of green paper for depth, or mix in metallic cardstock for extra shine. Adding tiny embellishments like rhinestones, sequins, or even real mini pinecones gives the wreath texture and dimension. Some people like to keep it simple with just the wreath and a sentiment, while others go all out with ribbons, bows, and glitter.
Even without fancy embellishments, a well-cut paper wreath on a contrasting background makes a strong statement. A dark green wreath on cream cardstock with a simple gold “Merry Christmas” looks elegant and timeless. These cards are also great for mass-producing since the die-cutting process is quick once you get into a rhythm. Pop on a holiday movie, crank out a dozen wreaths, and call it a productive afternoon!
Tips for stunning die-cut wreath cards:
- Use at least two shades of green for a more realistic look
- Add a pop of red with berries or bows for classic Christmas vibes
- Layer the wreath over a stamped or embossed background for extra interest
- Try non-traditional colors like navy, silver, or blush pink for a modern twist
- Use foam adhesive to raise the wreath off the card for dimension
8. Stamped Snowflake Christmas Cards
Stamped Snowflake Christmas Cards are the ultimate way to create elegant, wintry designs without breaking a sweat. All it takes is a good snowflake stamp, some ink or embossing powder, and a steady hand. These handmade Christmas cards scream sophistication, especially when done in metallics like silver or gold on dark cardstock. The best part? Once you’ve got your stamp and supplies, you can whip up a bunch of these in one sitting.
The magic happens when you experiment with different techniques. Heat embossing with white or sparkly powder gives snowflakes a raised, frosty texture that catches the light beautifully. Or try stamping multiple snowflakes in varying sizes across the card for a scattered, snowy effect. Layering colors—like pale blue ink with silver embossing—adds depth and makes the design feel more dynamic.
For anyone who loves repetitive, meditative crafting, stamping is incredibly satisfying. Line up your cards, ink the stamp, press it down, and repeat. Add a simple “Let It Snow” or “Season’s Greetings” sentiment in the corner, and you’ve got yourself a classy card that looks way fancier than the effort required. Plus, snowflakes never go out of style, so these cards work for anyone on your list.
Stamping techniques that elevate snowflake cards:
- Heat emboss with white or holographic powder for a frosty finish
- Stamp snowflakes randomly across the card for a natural snowfall look
- Use a gradient of ink colors from light to dark for an ombre effect
- Add tiny dots of glitter glue to snowflake centers for extra sparkle
- Layer stamped snowflakes over a watercolor or ink-blended background
9. Vintage Photo Christmas Cards
Vintage Photo Christmas Cards bring a nostalgic, heartfelt touch that modern designs just can’t match. These handmade Christmas cards work beautifully with old family photos—think black-and-white snapshots from decades past or sepia-toned portraits that tell a story. Printing a favorite vintage photo and mounting it on a card with some festive embellishments instantly creates a keepsake that recipients will want to frame.
The charm of these cards is in the mix of old and new. A grainy photo from the 1950s paired with modern washi tape or metallic accents creates an interesting contrast. Adding handwritten details like “Merry Christmas from our family to yours” in calligraphy or a simple script font keeps things personal. Some people even scan old holiday cards from grandparents and incorporate them into new designs, creating a beautiful generational connection.
What’s especially cool is how these cards spark conversations. When someone receives a vintage photo card, they’re not just getting holiday wishes—they’re getting a piece of history and a story to share. Whether it’s a photo of the sender as a kid or a beloved family member who’s no longer around, these cards carry emotional weight that mass-produced ones never could.
Ideas for vintage photo cards:
- Use black-and-white or sepia photos for that timeless look
- Frame the photo with decorative corner stamps or stickers
- Add a simple red or green mat around the photo for a pop of holiday color
- Include a handwritten caption or date to provide context
- Pair vintage photos with modern sentiments for a fun juxtaposition
10. String Art Christmas Tree Cards
String Art Christmas Tree Cards combine texture, creativity, and a bit of patience into one seriously impressive handmade Christmas card. Instead of just drawing or stamping a tree, this method uses thread or embroidery floss woven through tiny holes punched in cardstock to create a geometric, modern design. The result? A card that looks like it took serious skill (even if it didn’t).
The process starts with mapping out a simple triangle shape on the card and marking evenly spaced dots along the edges. Then comes the fun part: threading a needle and crisscrossing the string from point to point to fill in the tree shape. Some people like to use a single color of thread for a minimalist vibe, while others mix greens with gold or silver for added flair. The finished design has a cool, handcrafted texture that stands out from typical flat cards.
What makes string art cards special is the tactile element. When someone runs their fingers over the card, they can feel the raised threads and appreciate the effort that went into it. These cards work great for anyone who loves geometric designs or modern aesthetics. Pro tip: using metallic thread or adding a few sequins at the “top” of the tree as a star takes it from nice to “where did you buy this?!”
Steps to create string art tree cards:
- Draw a triangle outline lightly in pencil on sturdy cardstock
- Mark evenly spaced dots (about 1/4 inch apart) along the triangle edges
- Poke holes through the dots with a needle or thumbtack
- Thread embroidery floss through the holes, crisscrossing to fill the tree shape
- Secure thread ends on the back with tape
- Add a star embellishment or sentiment to complete the design
11. Quilled Paper Christmas Cards
Quilled Paper Christmas Cards are tiny works of art that involve rolling and shaping thin strips of paper into intricate designs. This handmade Christmas card technique looks incredibly detailed and delicate—think swirling Christmas trees, snowflakes, or ornaments made entirely from coiled paper. While it requires a bit more time and precision than other methods, the results are absolutely stunning and guaranteed to impress.
The basic technique is simple: take a strip of colored paper, roll it tightly using a quilling tool (or even just a toothpick), and then glue the coil onto the card in whatever shape you’re creating. By pinching and shaping the coils, you can create leaves, petals, loops, and all sorts of festive elements. Quilled Christmas trees made from green coils stacked in graduated sizes look especially elegant, and adding tiny red coils as “ornaments” gives them extra charm.
What’s great about quilling is that it’s surprisingly forgiving once you get the hang of it. The coils don’t have to be perfect—slight variations actually add character and make the design feel more handmade. These cards are perfect for anyone who enjoys detailed, meditative crafts and wants to create something truly special. Fair warning though: once you start quilling, it’s hard to stop!
Popular quilled designs for Christmas cards:
- Christmas trees made from stacked green coils
- Snowflakes with intricate loops and swirls
- Wreaths formed from small coiled circles in various greens
- Ornament shapes filled with colorful quilled patterns
- Candles with yellow “flames” and white quilled wax
12. Felt and Fabric Christmas Cards
Felt and Fabric Christmas Cards add a cozy, tactile dimension that makes them feel extra special to receive. Instead of just paper and ink, these handmade Christmas cards incorporate soft materials like felt cutouts, fabric scraps, and even buttons or ribbon. The result is a card that begs to be touched and appreciated for its texture as much as its design.
Creating these cards is all about layering. Cut a simple Christmas tree shape from green felt, glue it onto cardstock, and then embellish with tiny buttons as ornaments and a fabric star on top. Or use patterned fabric to create a patchwork stocking or present design. The mix of materials creates visual interest and makes each card feel unique and handcrafted in the best way possible.
The beauty of felt and fabric cards is that they work great for using up craft scraps. That tiny bit of plaid fabric left from a sewing project? Perfect for a lumberjack-style Christmas tree card. Those mismatched buttons in the junk drawer? Instant ornaments. These cards are environmentally friendly, budget-conscious, and totally charming. Plus, they’re a hit with kids who love gluing and sticking different textures together.
Materials and ideas for felt/fabric cards:
- Green felt cut into Christmas tree shapes with button decorations
- Plaid fabric for rustic, woodsy designs
- Red felt hearts or mittens with white stitching details
- Fabric scraps arranged as patchwork stockings or presents
- Ribbon bows glued as dimensional embellishments
13. Minimalist Line-Drawn Christmas Cards
Minimalist Line-Drawn Christmas Cards prove that sometimes less really is more. These handmade Christmas cards feature simple, continuous line drawings of classic holiday imagery—think a single-line Christmas tree, a star, or even a reindeer silhouette. The clean, modern aesthetic appeals to people who appreciate understated elegance and contemporary design.
The beauty of this style is that anyone can do it, even those who claim they “can’t draw.” Using a fine-tip black pen or marker, draw your design in one continuous line without lifting the pen from the paper. The imperfections and wobbly lines actually add to the charm and handmade quality. These cards look especially striking on high-quality white or cream cardstock with plenty of negative space around the design.
For those who want a bit more color, trying this technique with gold or silver metallic pens creates an elevated, luxurious feel. Adding a simple hand-lettered “Joy” or “Peace” in the corner keeps the minimalist vibe intact. These cards are perfect for modern homes and people who appreciate Scandinavian design or contemporary art. They’re also quick to make in bulk, which is a huge bonus during the holiday rush.
Tips for minimalist line-drawn cards:
- Use a fine-tip pen (0.3mm-0.5mm works great) for clean lines
- Practice your design on scrap paper first
- Embrace imperfections—they add character
- Stick to one or two colors maximum
- Leave plenty of white space for a clean, modern look
- Add a simple sentiment in matching minimalist typography
14. Glitter and Sparkle Extravaganza Cards
Glitter and Sparkle Extravaganza Cards are for people who believe that more is more and that the holidays should shine as bright as possible. These handmade Christmas cards don’t do subtle—they go all out with glitter, sequins, metallic paper, and anything else that catches the light. If someone opens your card and doesn’t immediately need sunglasses, you’re not doing it right!
The key to a good glitter card is strategic placement. Covering the entire card in loose glitter is messy (trust me), so using glitter glue, glitter cardstock, or adhesive sheets with glitter on top works way better. Create a Christmas tree silhouette with glitter glue, outline a star with sparkly washi tape, or cut ornament shapes from holographic paper. Layer different types of shimmer for maximum impact—think silver sequins with gold glitter accents.
Sure, these cards might leave a trail of sparkles wherever they go, but that’s part of their charm. Recipients will find glitter on their hands, their tables, maybe even their faces—but they’ll also smile every time. These cards are especially fun to make with kids who think more glitter is always the answer (and honestly, they’re not wrong). Just maybe make them outside or on a surface that’s easy to clean!
Ideas for maximum sparkle:
- Use glitter cardstock as your base for instant shimmer
- Create designs with glitter glue pens for controlled sparkle
- Add sequin “ornaments” to paper Christmas trees
- Use holographic or foil paper for die-cut shapes
- Shake loose glitter over wet glue for a snow effect (best done in a box to contain the mess!)
- Mix different types of glitter (fine, chunky, shaped) for texture
15. Interactive Slider and Pull-Tab Cards
Interactive Slider and Pull-Tab Cards take handmade Christmas cards to the next level by adding movement and surprise. These cards feature elements that slide back and forth or pull to reveal hidden messages or images. Imagine a card where pulling a tab makes Santa slide down the chimney or a slider that reveals different holiday scenes. The interactive element makes these cards especially memorable and fun.
Creating slider cards requires a bit more planning than standard cards, but the effect is worth it. The basic mechanism involves cutting slits in the card front and threading a pull tab through, with an image attached that moves when the tab is pulled. Slider cards work similarly but use a channel system that allows an element to move horizontally across the card. There are tons of tutorials and templates available online to get started.
What makes these cards so special is the element of surprise and play. Kids especially love getting cards they can interact with, pulling tabs over and over to watch Santa go up and down or a reindeer prance across the card. Adults appreciate the creativity and engineering that goes into them. These cards definitely take more time to make, but the reactions they get make them perfect for special people on your list.
Popular interactive card ideas:
- Santa sliding down a chimney with a pull-tab mechanism
- A present that “opens” when you pull a tab to reveal a message inside
- A snowman that slides across a winter scene
- A star that moves across the sky when a tab is pulled
- A window that opens to reveal a holiday scene inside
Frequently Asked Questions About Handmade Christmas Cards
What supplies do I need to start making handmade Christmas cards?
The basic supplies for handmade Christmas cards include cardstock or blank cards, adhesive (glue stick, double-sided tape, or liquid glue), scissors, and markers or colored pencils. Beyond that, it depends on your chosen technique—washi tape, stamps and ink pads, embroidery floss, watercolor paints, or embellishments like buttons and sequins. Starting with what you already have at home is perfectly fine!
How long does it take to make handmade Christmas cards?
Time varies dramatically depending on the complexity of your design. Simple cards using washi tape or stamping can be completed in 10-15 minutes each, while intricate designs like quilling or embroidery might take 30-60 minutes per card. Planning a card-making party or dedicating a weekend afternoon can help you create multiple cards efficiently.
Can kids help make handmade Christmas cards?
Absolutely! Many handmade card techniques are perfect for kids, including handprint and footprint designs, simple stamping, washi tape decorations, and collage-style cards using stickers and cut paper. Choose age-appropriate techniques and let kids express their creativity—the results might be messy, but they’ll be memorable and heartfelt.
How do I mail handmade cards with dimensional elements?
Cards with significant dimension (like pop-up elements, thick embellishments, or shaker elements) may require extra postage or special packaging. Visit your local post office to have dimensional cards weighed and properly stamped. Consider placing bulkier cards in padded envelopes for protection during mailing.
What’s the best paper for handmade Christmas cards?
Cardstock in the 80-110 lb weight range works beautifully for most card bases—it’s sturdy enough to hold embellishments without flopping but still folds cleanly. For watercolor cards, use watercolor paper or heavy mixed-media paper that won’t buckle when wet. For printing photos or sentiments, regular cardstock or photo paper works well.
How can I make my handmade cards look more professional?
Focus on clean lines, even spacing, and quality materials. Use a bone folder to create crisp folds, measure and mark placement before gluing elements down, and choose a cohesive color palette. Quality cardstock, archival ink, and thoughtful composition make a huge difference. Don’t overcrowd your design—negative space is your friend!
Where can I find inspiration for Christmas card designs?
Pinterest, Instagram, craft blogs, and YouTube offer endless inspiration for handmade card designs. Search for specific techniques or styles you’re interested in. Craft stores often have display samples and project kits that can spark ideas. Nature, wrapping paper designs, and even Christmas fabric patterns can inspire card layouts and color combinations.
How far in advance should I start making Christmas cards?
If you’re planning to make cards for your entire list, starting in October or early November gives you plenty of time to work at a relaxed pace without holiday stress. Making a few cards each weekend leads up to December works better than trying to crank out dozens in a frantic marathon. That said, simple designs can be made successfully even a week or two before you need to mail them.
Final Thoughts on Handmade Christmas Cards
Creating handmade Christmas cards is about more than just saving money or avoiding the store—it’s about putting a piece of yourself into something tangible that brings joy to others. Whether you’re painting watercolor wreaths, stamping elegant snowflakes, or helping little ones make footprint snowmen, each card carries the time, thought, and care you invested in it.
The beauty of handmade cards is that perfection isn’t the goal. Wobbly lines, uneven glitter, and slight smudges are proof that a real person made this card specifically for the recipient. In a world of mass-produced everything, that personal touch means something special. So grab your supplies, put on some holiday music, and create something beautiful. Your friends and family will treasure these handmade greetings far more than anything store-bought—guaranteed!